
Jobs are used in various ways in R365. They are assigned to Employees and used by the Scheduling Module. Jobs are also used in conjunction with the POS Integration to track Employee Punches. Each Job record is assigned to a GL Account for Labor Cost assignment.
Creating / Viewing / Editing Job Titles
Job Titles can be created using the following methods:
- Auto-Import from POS - Jobs are most often created by your POS Integration. If a new Job is entered into your POS, but does not currently exist in R365, it will be automatically imported during your next data sync
- Manual Creation - You can manually create a Job record by hovering over the Scheduling Menu in the top ribbon and selecting 'New Job'

Existing Jobs can be viewed in the 'Scheduling' module.

General Tab

1) Job Title - The name of the Job in R365. If this Job was created by the POS Integration, this value will be populated with the same value found in your POS, but it can be updated as needed
2) Job Type - This optional open text field can be used for further Job classification and filtering
3) Job Code - The Job Code name as defined in the POS system. Do not change this field. If you are creating this Job manually, you can leave this field blank
4) Representing Color - The color this Job will show up as in the Scheduling module. It helps to color code different jobs as different colors so at a quick glance on the schedule its easy to see which jobs are assigned
5) Description - A user defined field that may be used to enter a more detailed description of the Job Title
6) POS ID - This is the ID of the Job according to the POS. Do not change this field
7) Exclude From Schedule Checkbox - Check this box if you do not want this Job to appear in the Scheduling module
8) Exclude From POS Import Checkbox - Check this box to exclude this Job from POS Imports. This is typically used on manually created Jobs or Management Jobs that you want to exclude from Labor Accruals
9) Location - Each Job is Location specific. If you have 10 Locations and a Job titled 'Cook' in the POS at each Location, then you would have 10 Jobs named 'Cook', with each assigned to a different Location. Each Location's POS will likely have a different POS ID for the Job and you may also have other differences such as Pay Rate or the GL Account you wish to post to
10) GL Account - This is where you specify which GL Account you want Labor Accruals to debit for Labor Punches of this Job. Common GL Accounts might include: 'BOH Labor', 'FOH Labor', or more detailed GL Accounts such as 'Line Cook Labor'
11) Pay Rate - The default pay rate for this Job, which is used for scheduling Labor. Individual pay rates for each Job can also be assigned for specific Employees on the 'Employees' tab
12) Department - Select the Department that this Job will reside within for Scheduling purposes
Employees Tab

Use this tab to view, add, or remove Employees assigned to this Job. To add Employees, select the Employee in the Employee Selector, then click the 'Add' button. To unassign this Job to a specific Employee, click the trash can icon on the far right of the row you want to remove.
Employee Ratings
Once an Employee has been assigned to a Job, they can also receive a private star Rating. These ratings are not displayed to the Employee and are used to rate your Employees within their respectful Jobs. The rating is used in scheduling so that you can set that a specific shift must be filled by an employee with a certain rating (i.e. only 4 star or above Bartenders can work the Friday night Shift). You can use this to limit the eligible Employee's for that Shift based on the Rating. Ratings can be easily managed by clicking the appropriate stars on the row next to each job
Employee Pay Rates
For Users that do not have the Scheduler Security Role, Employee Pay Rates will be listed here. If a User has the 'Scheduler' role, no Pay Rates will be visible. These values will be imported from the POS where available, but can be manually updated as needed here, or on the Employee record.
Responsibilities Tab

This tab shows which Job Responsibilities are assigned to this Job. You can add them by selecting from the drop-down above the grid and clicking the 'Add' button. Job Responsibilities can be removed by clicking the trash can icon on the row you want to remove.
Job Responsibilities allow you to break a Job down into more detailed responsibilities/qualifications/certifications and only certain Employees will meet that criteria. You can then set those on the Employees that have them. When scheduling Shifts in the Scheduling module, you can specify what Job Responsibility is required on the Shift to limit which Employees are eligible for the Shift.
Example Scenario
If you have a job called 'Cook' but schedule where one Shift is working the Grill and another the Fryer, then 'Grill' and 'Fryer' can be setup as Job Responsibilities on the Job and then assigned to whichever Employees are qualified to do each Job Responsibility. On the Shift in the Scheduling module you can specify it will be for Job = Cook and Job Responsibility = Fryer. Only Employees with the 'Fryer' Job Responsibility qualification will be able to be assigned to that Shift. Click here for more information on Job Responsibilities.
Job Titles and the POS Integration and Labor Accrual Entry
Job Titles offer an optional labor accrual tracking feature to POS integrations to Restaurant365.
A Job Title's purpose is to tell Restaurant365 what GL Account to debit when making Labor accrual entries from time punches entered in the POS system. It is a 'mapping' of POS job codes to Restaurant365 GL Accounts.
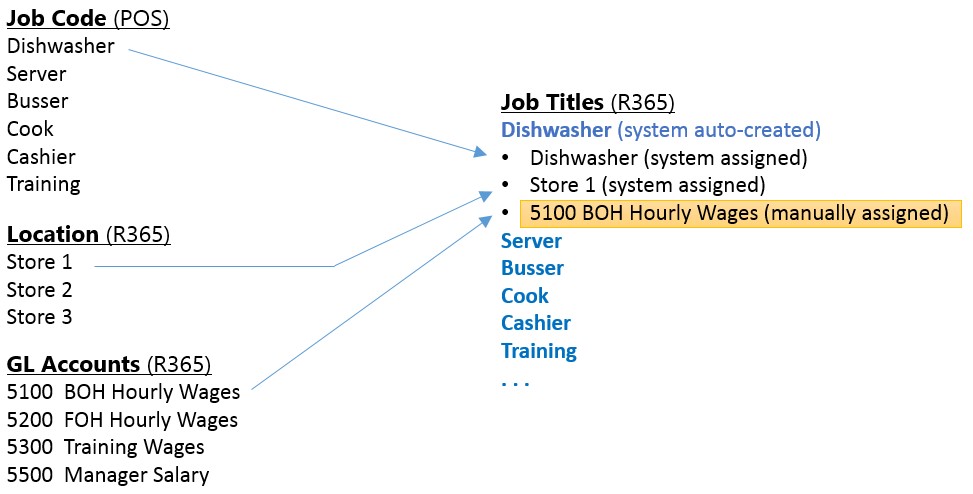
The Restaurant365 POS integration automatically creates Job Title records (in R365) for every job code imported from the POS to R365 and assigns them to a Location.
When the Job Titles feature is activated, the POS integration to Restaurant365 sums up all the time punches made by your staff each day and calculates the total daily spend on hourly labor using the pay rates from the POS system for that day.
Correcting Labor Accrual Entries for Previous Days
Managers will often make adjustments to labor entries in the POS system many days subsequent to when the labor was performed. For example, there might be workers who forgot to clock out on a given day, thereby causing the daily labor accrual to expense more labor than what was really used.
Managers periodically review the hours in their POS system and make appropriate corrections. In order to update Restaurant365 with these POS corrections and keep labor accruals accurate, Restaurant365 integration re-sweeps all labor entries from the POS system for the previous 14 days and updates all the accrual entries for each day, each time the integration is run.
To learn more about how the system can accrue daily labor expenses for salaried labor, see training for the Location Setup window.

The full list of Job Titles created from the integration with your POS can be seen in the 'Jobs' list view, accessed from the navigation pane. To get there, navigate to the Scheduling module and then click 'Jobs' under the 'Scheduling' in the left navigation pane.
Updating Job Titles on an On-going Basis
After the initial setup, and all the Job Titles have been mapped to GL Accounts, there are occasions where new Job Titles are added to the POS system. On the day these are used in the POS system, the Restaurant365 integration will pick these up and auto-create a new Job Title.